Over the past few years technological advancements in FDM/FFF 3D Printing have been focused on making the machines easier to use and improving existing features that were introduced during the 3D Printing Boom like Dual Extrusion.
3D Printers can now print 'smaller microns' and manufactures are starting to offer customers the option of using smaller diameter nozzles to improve print detail and accuracy, this however still leaves undesirable layer lines. In the majority of cases these layer lines are ugly and can be a turn off when trying to make a finished product or a model to paint.
Back in May 2016, advanced filament manufacturer Polymaker announced a unique complete solution to remove 3D printed layer lines using good old Isopropyl Alcohol. The technology consists of their new PolySmooth filament; a PVB based material developed specifically for polishing and the Polysher; a sealed machine that generates an aerosol of IPA (Isopropyl Alcohol) or ethanol that evenly smooths and polishes your 3D Printed parts.
To say I was enthusiastic to receive our Polysher is a bit of an understatement. There really aren't any other products on the market like this, so we were excited to start polishing and testing this machine. Whilst our unit is a pre-production model, it is my understanding that this unit is as close to the final product as possible.
The Polysher
What’s In The Box & Set Up.
The Polysher arrived fully assembled so it didn’t take long to get started. Inside the box was the Polysher machine, a power supply, 2 x Nebulizers, a grate style reservoir cover to use during polishing, a solid reservoir cover to use during storage and 2 x Platforms. The final packaging will also include a 30ml suction pipette to drain the reservoir.
All that was required to start polishing was to fill the reservoir with alcohol and install / prime the nebulizer. To access the reservoir, simply raise the platform with the "Open / Close" button. With the platform raised you can lift and hold the chamber casing with one hand and fill the reservoir with your choice of Isopropanol Alcohol or ethanol, 70% or above [90% or higher recommended] which are easily obtainable in most countries.
Note: It is very important to only use IPA or ethanol in the Polysher. Using other spirits such as denatured alcohol, or other chemicals / solvents such as acetone will irreparably damage your Polysher with an increased risk of hazard.
To install, simply insert the nebulizer making sure the connector pins are lined up. After installing a new nebulizer it needs to be primed. I found if you end up flooding the nebulizer with IPA, the aerosol may not rise to the maximum chamber height limiting your polishing potential. If this does happen, once the nebulizer has dried out it should operate normally. I found 10 drops of IPA onto the nebulizer was the perfect amount for priming and using this method I haven’t had any issues. As it's currently summer here in Australia, we would occasionally need to reprime the nebulizer before use the next day. This may be required in hot climates like ours however shouldn't be the case in other seasons and for countries with moderate weather.
Operation
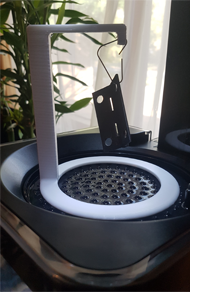
The front control panel was designed to be clean and easy to use, featuring only 3 buttons (On/Off, Open/Close and Chamber Lighting) and a control dial to set the polishing time. It’s nice that Polymaker followed the KISS principal, Keep It Simple Silly!
 After placing the model on the polishing platform and lowering the model into the chamber, all I had to do was twist the control dial to set my polishing time. As you turn the dial, blue lights illuminate to indicate the set polishing time. Each blue light equals 5 minutes polishing time. For my first model (yellow octopus) I wasn't too sure how long to polish my model for but Polymakers manual suggested starting with 20-40mins, I initially decided that 20 minutes would be a good starting point to try but decided mid polishing to add another 5 minutes. and as you can see the result was fantastic!
After polishing the machine starts a “clearing cycle” to clear the mist from the chamber after this cycle you can raise the platform to access your part.
After polishing the model is very sticky so it’s important not to immediately touch the model, Polymaker recommend waiting around an hour before handling. The removable platform enables contact free removal so I could start polishing again with the spare platform immediately.
If you feel your model should have been polished longer you can put the model in again before or after drying.
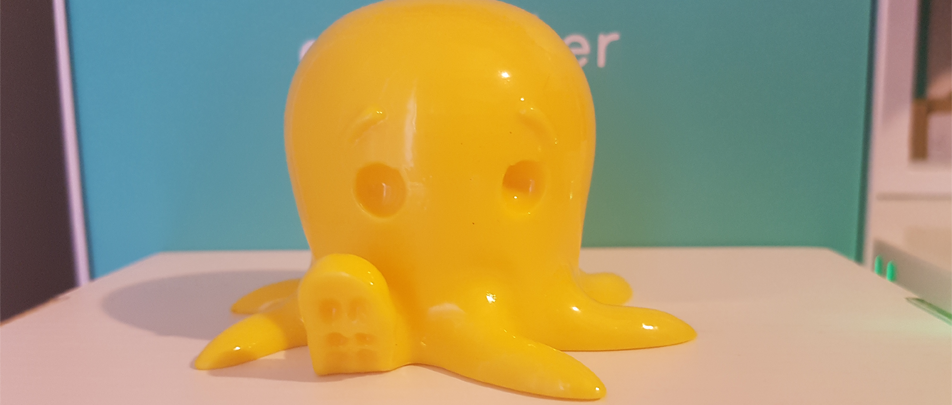
Octopus printed at 200 microns in PolySmooth English Mustard Yellow, Polished for 25 minutes
Design & Safety Features
Photo Credit: Polymaker
It was evident from the start that the Polysher had been designed with safety in mind.
To achieve a safe polishing experience, it is vital that the machine is sealed and cannot be opened during the polishing and clearing cycles. The platform lift has been designed to act as a locking mechanism so you can’t open the Polysher during operation. All electronics are sealed off and the chamber floor and reservoir was produced as a single moulded piece of plastic with a rubber seal between the base and the chamber casing to ensure no leaks during polishing.
I found the clearing cycle was really effective at clearing the mist and since alcohol is heavier than air, when the platform rises, any alcohol that may be left in the chamber won't spill out. I thought this was a really smart design choice. Smart electronics also prevent users from actioning certain functions like starting a polishing cycle when the platform is raised or the chamber is not 100% sealed. I have spent over a month and a half using the Polysher, polishing over 90 parts. During this time, I have had no issues or leaking.
The Polysher can polish models up to 15cm diameter and 18cm height. I expected that at some point I would have ideas too big for the Polysher but so far I haven't out grown the Polyshers size.
Results

A variety of vibrant models printed in PolySmooth and polished in the Polysher
After polishing, models exhibit a nice gloss and a feel similar to an injection moulded part. The gloss is enough to have an attractive shine under light however not glossy enough to ruin your creation with finger prints.
Smoothing was consistent across the entire model thanks to the Polyshers rotating platform, with detail loss barely noticeable at shorter polishing times. I found 25 minutes was my ideal polishing time for most of the models I printed.
I was interested in polishing a working nut and bolt to see how the tolerance between the threads would be affected. The file I chose to print also had a knurled texture which printed roughly. After polishing the texture was vastly improved and the Nut and Bolt screwed together perfectly, with no noticeable tolerance change.
Working nut and bolt printed in PolySmooth Teal printed at 0.08mm layer height and polished for 20 minutes
Like some other materials, PolySmooth changes to a lighter matte finish after sanding. This is a turn off for other materials as the colour of the model differs in areas you have sanded. I noticed after polishing, the model returns to a consistent glossy colour and stress marks caused during support removal are also removed.

The best smoothing results are achieved when your layer lines are consistent and your printer is calibrated correctly. I found if you have noticeable banding (eg. caused by axis shifting) these defects will most likely still be noticeable after polishing, in the same way that fine details on the model are still retained. Like any other post processing process like vapour smoothing and painting, the Polysher will not solve defects caused by under extrusion, layer shifting or inadequate cooling, as to remove these details with the Polysher you would need to also sacrifice a high level of detail.
PolySmooth
PolySmooth is the first material released in what Polymaker have called their "polyshable family". Shortly after it was announced, Polymaker were generous enough to send us a pre-production roll of Black PolySmooth to test. During our pre-production review last May; we printed a working hinge, standard sized working nut and bolt, ball in cage and an impressive 2.75mm working nut and bolt. These were models that we have had difficulty printing in the past with PLA but have worked exceptionally well in ABS. After seeing how well PolySmooth printed these models we stated:
“After our initial print tests we already think PolySmooth PVB could be a real candidate to replace ABS.” – Inside look at Polymakers brand new PolySmooth Filament, 3D Tech Supplies
Since our initial Polysmooth review, I have had the opportunity to test 7 more PolySmooth colours with a variety of different models. Colours include; Jet Black, Snow White, Slate Grey, Coral Red, Electric Blue, Polymaker Teal, English Mustard Yellow and the truly unique Transparent variant.
Printing Characteristics:
Upon receiving our production rolls of PolySmooth I noticed a change to the printing temperature range. Polymaker originally recommended a printing temperature of 190-220 °C for the 2016 pre-production spool. The temperature on the production rolls has now been bumped up to 210-230 °C. This is interesting as I’m not aware of any formulation changes between the two production models. My curiosity caught the best of me so I tried printing PolySmooth at 200°C and it worked great! So far I have tried printing PolySmooth between 200-225°C across four machines and have had no issues. All the printers I have access too are equipped with heated beds so I printed with the bed around 60°C, however Polymaker have stated that a heated bed is not required.
The temperature range is wide enough that I was able to start with the printers default PLA settings and achieve really great results. It was great that i didn't have to waste filament on test prints, it just worked.
Support and Raft Removal:
I found removing the support material comparable to removing high quality ABS supports. It really just peels off the model unlike PLA supports which tend to be more difficult to remove.
I personally try to avoid printing with a raft as I find it’s a nuisance to remove from larger models (regardless of material). I guess my fingers are too delicate for the process. While I will always prefer the results of a raftless print, I actually found the raft removal process for PolySmooth was easy relative to my past experiences.
Material Properties:
PolySmooth has a higher tensile strength and impact resistance than both ABS and PLA, which really expands the possibilities of this technology. After polishing, parts exhibit an increased impact resistance (Polymaker have mentioned there is no effect on tensile strength). This is because layer lines are similar to a woodgrain in the sense that they act as weak points. The polishing process fuses these layer lines into one equal surface. I haven’t printed anything that will take full advantage of these properties yet but this is something I would like to explore in further projects.
PolySmooth Transparent!
I was really impressed with the Transparent variant of PolySmooth. In the past transparency has been practically impossible to achieve on FDM printers because layer lines diffuse light. Because the Polysher removes layer lines, you can achieve unmatched optical clarity for single shell objects. What was really interesting to me was the pearlescent effect created when printing objects with an infil. This effect changes depending on your infil type and percentage.
PolySmooth Transparent provides a unique pearlescent effect depending on your infil. Print a single shell model for unmatched transparency.
Polysher vs Acetone Vapour Smoothing
Since the results seem similar, there have naturally been comparisons made between Polymakers technology and the DIY Acetone Vapour Smoothing technique. I thought I would highlight the important differences between the two.
Note: A few years ago we treated a Model car engine by Acetone vapour smoothing. I had planned to print and polish the same model in Polysmooth with the Polysher to compare. Unfortunately I could not locate the engine STL file so I’m using a PolySmooth print of Ben Dansie’s ‘Plunderbuss Pete’ to compare.
Method:
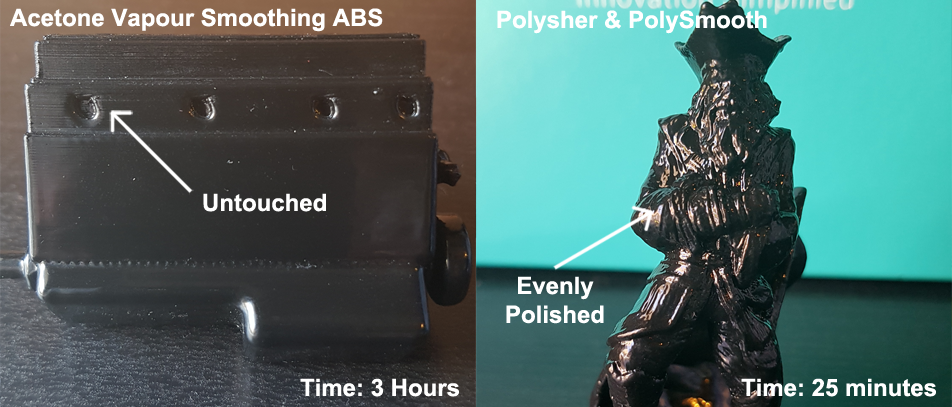
Acetone vapour smoothing [Vapour-phase process]: The vapours created as acetone evaporates smooth the surface of ABS printed parts. My experience with acetone vapour smoothing took 3 hours to smooth at room temperature. Some users heat up the acetone to speed up the process, but this can be incredibly dangerous.
Polysher [Liquid-phase process]: generates an aerosol (suspension of micro-sized droplets) of Isopropyl Alcohol. A rotating platform and nebuliser distribute the microdroplets evenly on the surface of a PolySmooth printed part. No heat is used in the process and it takes around 20-25 minutes to smooth a similar sized model.
Safety:
Acetone is more volatile than IPA which is commonly used as a nail polish remover. IPA is commonly used in hand sanitisers and cosmetics. While both solvents are flammable, the Polysher is sealed and has sealed electronics to ensure no sparks can be generated in the Polysher. Acetone Vapours are not contained and are in the open.
Comparing the Results:
Results from the Polysher were far more consistent, with a smooth surface across the entire model. Results from Acetone vapour smoothing were more concentrated towards the bottom of the model, with the top layers practically untouched. I know there have been some decent results from Acetone vapour smoothing but there is a definite learning curve and risk when using that technique. Taking in to account the safety features, speed and results, I think the Polysher is a far more effective and consistent method for removing the layer lines from 3D Prints.
Creative Polishing Techniques
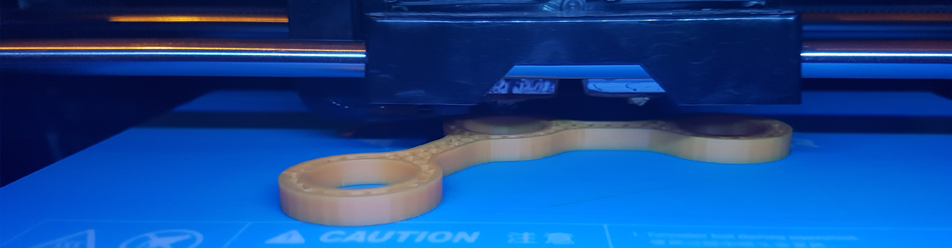
 During the polishing process some models are improved by suspending or changing the polishing orientation. I had printed a umake keychain to send to our resellers. Typically you would see all sides of a keychain so I wanted the bottom of the keychain to look the same as the top. I could have polished the model for 5-10 minutes, flipped it over and continued polishing however both the top and bottom of the keychain would have small contact marks where the platform touches the model.For this model, I designed some stands printed in PLA which allow me to hang the keychain. This worked really well. Using a hanging stand is ideal for prints that are thin and difficult to stand on their own and great to polish models too long for the platform.
I have uploaded this design on our thingiverse page so you can start printing or remixing your own!
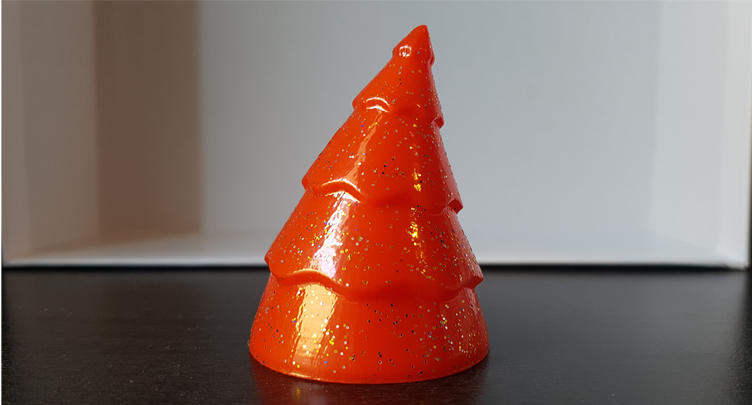
I found there are many other creative ways to use the Polysher. For Christmas I wanted to polish some Christmas 3D printed ornaments.I found this nice tree and after polishing the tree I applied glitter while the model was still sticky. I made sure to add the glitter outside the Polysher of course over a sheet of baking paper (no one wants glitter in their Polysher). I think the result looks great!
Final Thoughts
I think the Polysher exceptionally achieves its goal to consistently remove layer lines from 3D Prints, offering easier, faster and more consistent results. I appreciate that Polymaker kept simplicity and safety a focus in their methodology when designing the machine.
While ABS and PLA cannot be smoothed in the Polysher, I think Polymaker really nailed the formula for PolySmooth which is a high quality easy to print material with useful mechanical properties. This has become one of my favourite materials to print and I could easily see people picking up PolySmooth for general printing, even if they don't own a Polysher. Polymakers plan to develop more Polysher compatible materials is also quite exciting.
In the past, the dangers, difficulty or time consuming nature of other post processing techniques has made it difficult for schools, families and workplaces to improve the appearance and textile feel of their 3D Prints. The Polysher is a truly unique solution that makes 3D smoothing accessible to everyone.
I look forward to seeing how the Polysher and PolySmooth impact what we expect from FDM 3D Printing and its applications in the community.